
How to Check If a Wall is Perfectly Flat?

Published by Adeel Virk
Adeel is a founder & project manager at Virk Construction Management, delivering ethical, high-quality residential and commercial projects in NSW and Canberra.
Most people never think about wall flatness until they are standing in a freshly painted room, and the afternoon light hits at just the right angle. Suddenly, every bump, hollow, and ridge shows up like it was always there, waiting to embarrass someone. It is one of those things that feels invisible until it is very obviously not.
So whether you are prepping for tiling, installing cabinetry, or just doing a renovation check before handover, knowing how to assess wall flatness properly is genuinely useful. And the good news is that it does not require a bunch of fancy gear. It requires a bit of knowledge and a methodical eye.
Why Wall Flatness Actually Matters More Than You Think
Here is the thing about uneven walls. They do not just look bad. They cause real, practical problems down the line.
A wall that is out of flat by even a few millimetres can cause tiles to crack or pop off over time. Cabinetry sits unevenly. Skirting boards and cornices leave visible gaps. Freshly applied paint looks textured in raking light. These are not cosmetic complaints. There are signs that the substrate was not checked properly before work started.
In the Australian construction industry, particularly across Canberra, NSW, and the ACT, wall surface tolerances are covered under the Australian Standard AS 3740 and related plastering codes. These standards exist because flat walls are not just an aesthetic preference. They are a quality benchmark.
Want Confidence in Your Build Quality?
Understand how every detail fits into your project. Virk Construction Management includes thorough quality checks as part of a reliable and structured process.
Speak With Our TeamThe Tools You Actually Need
Before getting into the methods, here is the truth. You do not need expensive equipment to check a wall. You need the right tools used the right way.
| Tool | What It Does | Cost Range (AUD) |
|---|---|---|
| 1.8m Aluminium Straight Edge | Checks flatness over a large span | $30 to $80 |
| Spirit Level (600mm to 1200mm) | Checks plumb and level simultaneously | $25 to $70 |
| Feeler Gauge Set | Measures exact gap size under the straight edge | $10 to $30 |
| String Line | Checks bow or bulge over long distances | $5 to $15 |
| Torch or Work Light | Raking light to visually expose surface irregularities | Already own one |
That is it. Nothing exotic. The method matters far more than the gear.
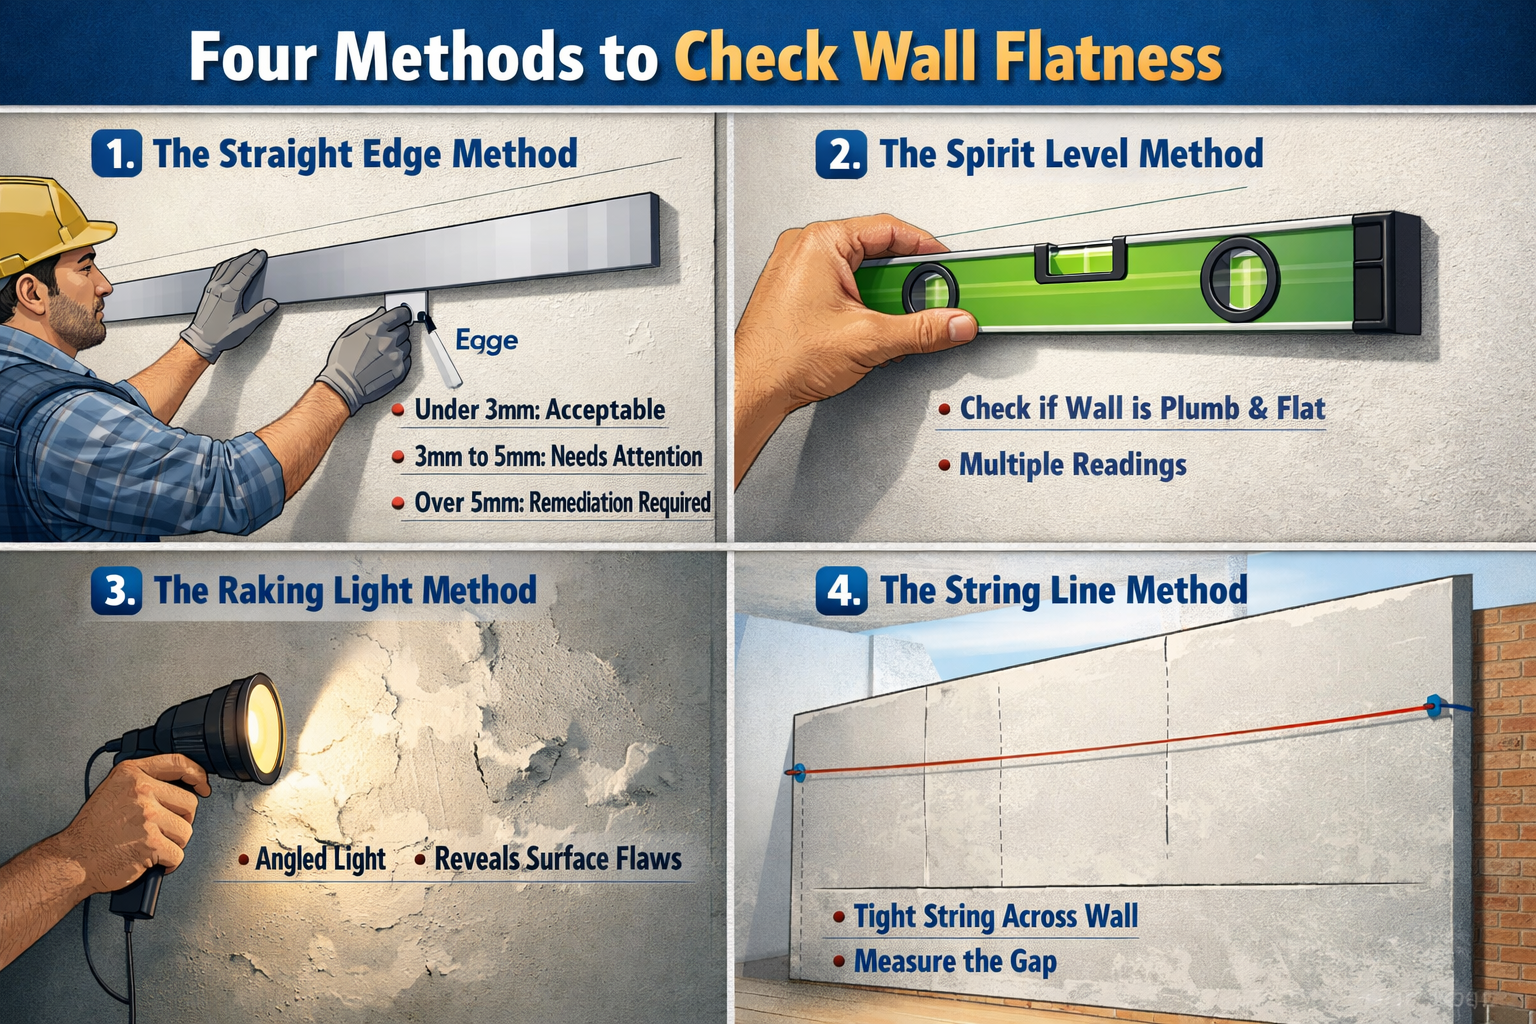
Four Methods to Check Wall Flatness
1. The Straight Edge Method
This is the most reliable method for interior walls, and the one most tradespeople actually use on site.
Hold your straight edge flat against the wall surface and move it horizontally, vertically, and diagonally across different sections. Any gap between the straight edge and the wall surface is your deviation. This is where the feeler gauge comes in. Slide it into the gap to measure exactly how large it is.
What the numbers mean:
Under 3mm over a 1.8m span: Acceptable for most painted or rendered surfaces
3mm to 5mm: Borderline. Needs attention before tiling or cabinetry
Over 5mm: Significant deviation. Remediation is required
The key is to check multiple spots. Run the straight edge in at least three horizontal passes, three vertical passes, and two diagonal passes per wall. Cover the full surface, not just the easy middle section.
2. The Spirit Level Method
A spirit level does two jobs at once. It tells you whether the wall is flat and whether it is plumb (perfectly vertical). Press the level firmly against the wall. Read the bubble. Then move to a different spot and repeat. You are not just checking one reading. You are building up a map of the whole wall.
This method works particularly well for checking walls before installing vertical features like door frames, built-in wardrobes, or vertical tile layouts. A wall that reads plumb at the top but tilts at the bottom is a problem that will show up the moment something straight is placed against it.
3. The Raking Light Method
This one requires no tools at all. Just a strong torch or a portable work light. Hold the light at a sharp angle (roughly 10 to 15 degrees) to the wall surface, and move it slowly from one end to the other. Any surface irregularity will cast a shadow. Bumps, hollows, ridges, and waves all become visible immediately.
This method is especially useful for painted or rendered walls where you are trying to assess the finish quality before sign-off. It is also the method that picks up things the straight edge might miss, like broad, shallow bows that develop gradually across a wide surface.
4. The String Line Method
For long walls (anything over three metres), a string line gives you a better picture than a straight edge alone.
Fix one end of the string at one corner of the wall and pull it tight to the opposite end, keeping it parallel to the surface and about 50mm away from it. Then measure the distance from the string to the wall at regular intervals, say every 300mm. Consistent measurements mean a flat wall. Variations tell you where the bow or hollow is. This method is particularly useful outdoors or in large rooms where a standard straight edge cannot span the full length.
A Quick Comparison of the Methods
| Method | Best For | Detects | Skill Required |
|---|---|---|---|
| Straight Edge | Pre-tile and pre-cabinet checks | Sharp deviations and localized bumps | Low |
| Spirit Level | Plumb checks, door and window areas | Vertical alignment issues | Low |
| Raking Light | Paint and render finish quality | Broad waves and surface texture | Low |
| String Line | Long spans over 3 metres | Overall bow across a large surface | Medium |
Understanding Australian Flatness Tolerances
The Australian construction industry does have documented tolerances for wall flatness, and knowing them helps you understand what is actually acceptable versus what needs fixing.
| Surface Type | Maximum Deviation | Span |
|---|---|---|
| General plastered walls | 3mm | Per 1.8m straight edge |
| Walls receiving tiles | 3mm | Per 1.8m straight edge |
| Walls receiving direct fix cladding | 4mm | Per 1.8m straight edge |
| Rendered external walls | 5mm | Per 1.8m straight edge |
| High specification finishes | 1.5mm | Per 1.8m straight edge |
Source: Relevant guidance can be found through the Australian Building Codes Board and associated Australian Standards for plastering and wall linings.
These numbers matter most when you are preparing a wall for a finish that will highlight every imperfection, like large-format tiles, high gloss paint, or polished plaster. A 3mm deviation that nobody notices under flat white paint becomes very obvious under a glossy finish in raking light.
Why Walls Go Out of Flat in the First Place
Walls do not become uneven randomly. There are specific causes, and knowing them helps you know where to look.
Framing issues: Timber studs that are bowed, twisted, or inconsistently spaced create uneven backgrounds for plasterboard
Plasterboard installation: Sheets installed under tension or with fasteners driven too deep leave surface irregularities
Plastering and rendering: Inconsistent trowel pressure, incorrect mix ratios, or drying too fast in hot conditions (very relevant in Canberra summers) lead to surface variation
Settlement: Building movement over time can cause walls to shift, particularly in older homes
Moisture damage: Water ingress causes plasterboard to swell and warp
Understanding the cause tells you whether you are dealing with a surface problem (fixable with compound or render) or a structural one (requiring the wall to be re-framed or re-sheeted).
What to Do When the Wall Is Not Flat
Once you have identified a problem, the fix depends on the size of the deviation.
Small deviations under 5mm: Fill with jointing compound or skim coat plaster. Sand back once dry and recheck with your straight edge.
Medium deviations between 5mm and 10mm: A base coat of render followed by a finish coat is usually the right approach. This needs time between coats and a proper cure.
Large deviations over 10mm: At this point, you are often better off re-sheeting the wall entirely rather than building up multiple thick coats of render. Thick applications of plaster compound tend to crack over time.
Framing issues: These need to be corrected before any surface work begins. No amount of render will fix a wall that is bowed at the stud level.
For renovation and construction projects in Canberra and the ACT, this is exactly where having an experienced eye on site makes the difference. You can also read more practical guides like this one over at the Virk Construction Management blog.
Final Thoughts
Checking wall flatness is not complicated. But it does require you to slow down, use the right method for the right situation, and actually cover the whole surface rather than just glancing at it. Most problems are found in the corners, near windows, and at the bottom third of walls. These are the spots that get rushed on-site.
Take the time to check properly before any finish goes on. It saves real money and real frustration later.
Working on a Build or Renovation in Canberra or the ACT?
If you are planning a construction or renovation project and want a team that understands quality standards from the ground up, Virk Construction Management works with homeowners and developers across Canberra, NSW, and the ACT. From pre-construction checks to full project oversight, the focus is always on getting the details right before they become expensive problems.
Ready to Talk About Your Project?
Reach out today and have a clear conversation about your project requirements. Get the right direction before you move forward.
Contact Us Today