
What Are the 7 Stages of Plastering? A Complete Guide for Homeowners

Published by Adeel Virk
Adeel is a founder & project manager at Virk Construction Management, delivering ethical, high-quality residential and commercial projects in NSW and Canberra.
Plastering is one of those trades that looks deceptively simple from the outside. A skilled plasterer working on a wall makes it look effortless. But the reality is that plastering is a layered, time-sensitive process with seven distinct stages, and each one depends on the one before it being done correctly. Miss a stage or rush the timing between coats, and you will be dealing with cracks, hollow spots, or failed paint adhesion within a year or two. This guide walks you through all seven stages, so you understand exactly what a quality plastering job actually involves.
Why the Sequence of Plastering Stages Matters More Than the Materials
Most homeowners focus on the final surface, which is the smooth wall they can see and touch. But the quality of that surface is really determined by everything that happens before the finish coat even goes on. Think of plastering like baking a layered cake: the base needs to be right before you add anything on top, and every layer needs the right amount of time before the next one is applied.
In Canberra and the ACT, where seasonal temperature swings are more extreme than coastal NSW, this timing matters even more. A plaster coat applied too quickly over one that has not set properly will not bond well, and the result is delamination, cracking, or worse. Understanding what should happen at each stage gives you the tools to oversee the work on your project with confidence. You can also read our guide on how to tell a bad plastering job for the warning signs to watch for once the work is done.
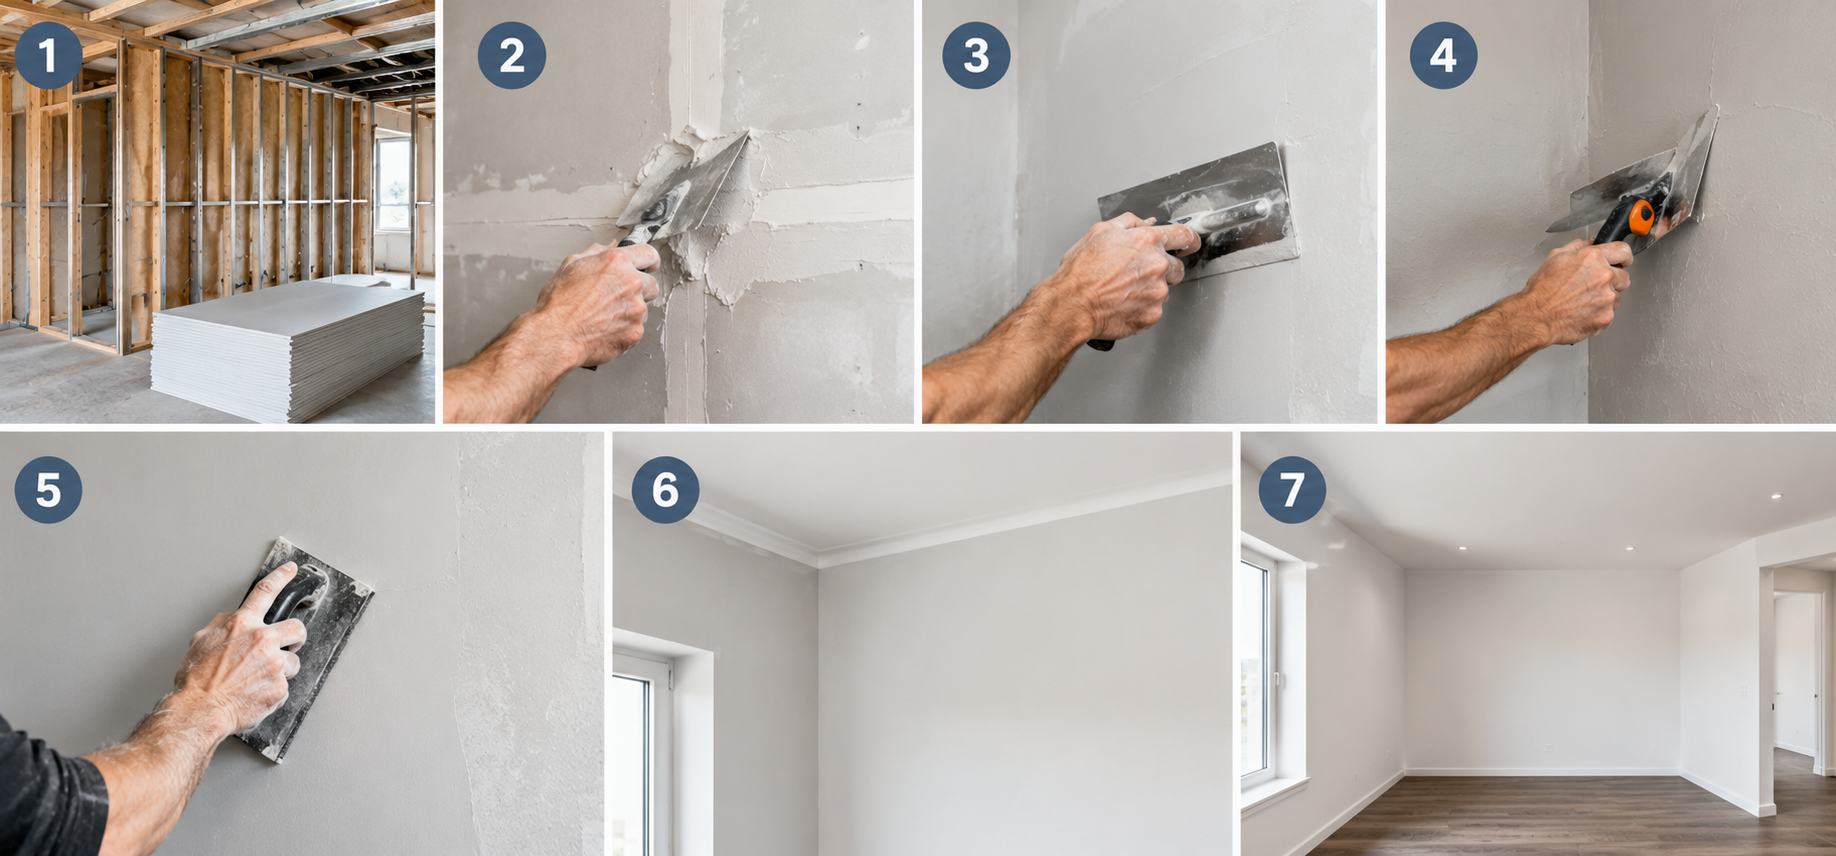
The 7 Stages of Plastering Explained
Stage 1: Surface Preparation
Surface preparation is the stage that decides whether everything else holds together. The substrate, which is the surface being plastered, whether brick, concrete block, plasterboard, or precast concrete, needs to be clean, structurally sound, and free from dust, oil, grease, loose material, and any old coatings that would affect adhesion.
For older homes in Canberra and regional NSW, this often involves:
Removing any friable or hollow sections of existing plaster
Filling deep voids or cracks with a compatible filler before the base coat goes on
Checking for and treating moisture and salt deposits (efflorescence) that would push future coats off the wall
Ensuring the wall plane is square and plumb before any material is applied
Before this stage is complete, the wall needs to be assessed for flatness and alignment. Our posts on how to check if a wall is perfectly flat and how to check for squareness explain exactly how this is done on a live construction site.
Stage 2: Applying the Bonding Agent or Key Coat
After the surface is prepared, the plasterer applies a bonding agent to help the first coat of plaster grip the substrate. On smooth surfaces like poured concrete, the plaster has nothing to mechanically lock into, so either a chemical bonding agent (typically PVA-based) or a spatterdash coat is used to create a rough texture.
A spatterdash is a thin, wet mortar mix that is thrown at the wall under pressure to form a rough, pebbled layer. On plasterboard, a diluted PVA bonding agent is more common. The choice depends entirely on the substrate and the plaster system specified for the project.
This is also the stage where the cement type selected for the mix becomes important. For cement-based systems, the choice between OPC and PPC affects setting time and workability at every subsequent stage. Our blog on whether OPC or PPC is better for plaster goes into the specifics of that decision.
Stage 3: The Scratch Coat (First Base Coat)
The scratch coat is the first substantial layer of plaster applied to the keyed surface. It is called a scratch coat because after application, it is deliberately scored or raked with a notched tool to create a rough, cross-hatched texture that the next coat can bond into.
For cement-based systems, the scratch coat is typically mixed at a ratio of 1 part cement to 3 or 4 parts clean sand, applied at around 8 to 10mm thick. This coat is not about looking smooth. Its entire purpose is to create a firm, rough base for the layers that follow. Over-trowelling this coat is one of the most common mistakes on site, as it brings water to the surface, weakens the outer skin, and reduces the texture needed for bonding.
Stage 4: The Brown Coat (Second Base Coat / Floating Coat)
The brown coat goes on after the scratch coat has sufficiently set, and this is where the levelling work happens. Using a long aluminium straight edge (called a darby or screed rail), the plasterer strikes off the surface to bring it to a flat, consistent plane. High spots are removed, and low spots are built up during this process.
The brown coat is typically 6 to 8mm thick and contains a finer sand mix than the scratch coat. It is the last opportunity to correct any significant unevenness in the wall before the finish coat is applied. Applying the brown coat too soon over a scratch coat that has not properly set is a common cause of delamination. Understanding the risk is important. Our post on what happens if cement sets too slowly also explains why setting conditions matter at every stage.
Stage 5: Straightening and Checking Accuracy
Before the finish coat is applied, the plasterer uses a long straight edge to identify remaining high or low spots, check corners for squareness, and verify that reveals and junctions are sharp and true. This step is less about applying material and more about checking and correcting the work done in Stage 4.
At this point, plaster grounds (small dabs of set plaster used as thickness guides) may already be in place from earlier stages. Corner beads on external corners are also checked and secured at this point because once the finish coat goes on, any misalignment in corners or edges becomes very hard to correct without significant rework.
Stage 6: The Finish Coat (Top Coat)
The finish coat is what you actually see on the completed wall, and it is the thinnest layer in the entire system, typically 2 to 3mm. This coat uses a finer mix, often incorporating lime putty, gypsum finishing plaster, or a proprietary polymer-modified compound, depending on the specification.
Application technique matters enormously at this stage. The plasterer applies the mix in sections and draws back over it with a steel trowel in long, overlapping passes. The final trowelling pass is done with a slightly dampened trowel to close up the surface and achieve the smooth, tight finish that reads well under paint.
Using a plasticizer in the finish coat mix is a common practice to improve workability and extend the open time. Understanding what plasticizers do and how they interact with the mix is covered in detail in our post on what a plasticizer is.
Stage 7: Curing, Drying, and Final Inspection
Once the finish coat is applied, the plaster needs time to cure and dry before any paint or coating is applied. These are two different processes. Curing is a chemical process where the cementitious material gains strength through hydration, and it requires moisture. Drying is the loss of free water from the mix, and it takes much longer.
Cement-based plasters typically require a minimum of 28 days before being painted with impermeable coatings. In Canberra, where low winter humidity can pull moisture out of fresh plaster quickly, the curing period may need active management, such as light misting or covering with damp hessian in extreme conditions.
Final inspection involves:
A tapping test to identify any hollow or delaminated areas
Checking the surface under raking light to reveal any ridges, trowel lines, or surface imperfections
Inspecting all corners, reveals, and junctions for accuracy
Confirming consistent colour across the surface, as uneven tone indicates inconsistent thickness or moisture loss during drying
Quick Reference: The 7 Stages at a Glance
| Stage | Name | Primary Purpose | Approximate Thickness |
|---|---|---|---|
| 1 | Surface Preparation | Clean and key the substrate | N/A |
| 2 | Bonding Agent | Improve mechanical and chemical adhesion | 2 to 4mm (spatterdash) |
| 3 | Scratch Coat | First base layer, keyed for next coat | 8 to 10mm |
| 4 | Brown Coat | Levelling and build-up layer | 6 to 8mm |
| 5 | Straightening | Accuracy check, corner and reveal formation | N/A |
| 6 | Finish Coat | Final visible surface layer | 2 to 3mm |
| 7 | Curing and Inspection | Strength development and quality control | N/A |
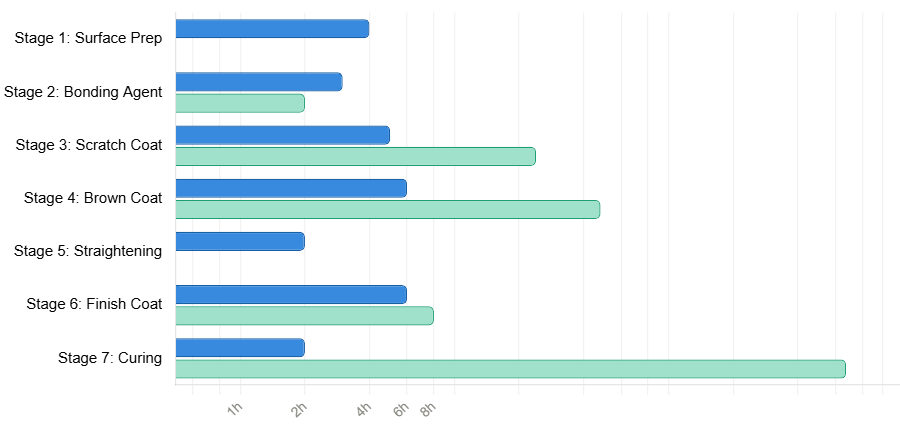
Approximate Time Required Per Stage
The Stages Most Frequently Skipped on Budget Jobs
In many residential renovations across Canberra and regional NSW, corners get cut at Stage 1 (surface preparation) and Stage 7 (curing). Both are invisible once the job is done, which is exactly why they are the first to disappear on rushed projects.
Skipping proper surface preparation means the plaster system is relying entirely on chemistry for adhesion rather than a genuine mechanical key. Skipping curing means the plaster is painted before it has developed its full strength. The wall may look fine for a year, but the long-term integrity of the plaster system is compromised from the start.
If you are planning a new build or home renovation in the ACT or NSW and want to understand what full-spec construction looks like at every stage, our blog on how to check if a wall is perfectly flat is a practical companion to this guide.
Planning a Commercial Fitout or Renovation in Canberra?
If you are managing a commercial renovation, office fitout, or residential build in Canberra or the ACT, plasterwork quality directly affects every finish that goes on top of it. Paint, tiles, joinery, and cladding all perform better on a properly executed plaster substrate.
At Virk Construction Management, we manage commercial fitouts and residential builds across Canberra, ACT, and NSW with a transparent, open-book approach so you always know exactly where your budget is going. Our team coordinates every trade, including plastering, to the right specification and sequence from day one.
Get in touch at Office@virkconstructionmanagement.com.au or call 0451 552 095 to talk about your project.